Skin grafting is a closure technique used in dermatology most commonly to close wounds created by the removal of skin cancer. Although currently less favored than flap closures, grafting can produce a good cosmetic result. Skin grafts, in contrast to flaps, are completely removed from their blood supply, whereas flaps remain attached to a blood supply via a pedicle. Skin grafts are less technically difficult but can be more time-consuming as the procedure creates a second surgical site. Skin grafts can be divided into several categories based on the composition of the graft with each type of graft having unique risks and indications.
-
Split-thickness skin grafts (STSG) are composed of the epidermis and a superficial part of the dermis.
-
Full-thickness skin grafts (FTSG) contain both the full epidermis and dermis.
-
Composite grafts contain skin and another type of tissue, usually cartilage.
Full-thickness skin grafts are the most commonly used graft in dermatology. FTSGs can provide an excellent tissue match for the host site and heal with minimal scarring and contracture. Composite grafts also have a high metabolic demand and typically are only used in the nose and ear in situations where cartilage also needs to be replaced. Split-thickness grafts are typically less cosmetically appealing due to a lack of adnexal structures and color mismatch. There is also a significant risk of contracture with STSG. Split-thickness graft donor sites also tend to be more painful for the patient compared to FTSG.[rx]
Anatomy
Grafting requires a good vascular supply for the survival of the tissue and a good donor match for an acceptable cosmetic result. Donor sites should match in the thickness, color, texture, and adnexal structures. Donor sites should match the actinic damage of the graft site as well, but it is more important the area be free of cancerous and precancerous lesions.[rx] If possible, donor sites should not transfer hair-bearing skin to non-hair-bearing areas. Epilation can be used to remove unwanted hair growth after the graft has healed. Common donor sites for facial FTSG are supraclavicular, preauricular, postauricular, and inner arm. The conchal bowl is a good source of sebaceous skin for grafts of the nose.[rx][rx] Donor sites for STSG are typically the trunk, buttock, thighs, or inner arm.[rx]
Skin grafts can technically be harvested from virtually any area of skin on the body, although certain areas are preferable. Full-thickness skin grafts (FTSGs) consist of complete epidermis and dermis, whereas partial-thickness skin grafts (PTSG) include the entire epidermis and only partial dermis. One should try to match, as closely as possible, the skin at the recipient site. Among the variables to consider are skin thickness, number, and prominence of sebaceous glands, presence or absence of hair, skin color, and amount of actinic damage. Some areas that are particularly useful for skin harvest are the pre- and postauricular areas, clavicular skin, and inner arm among others. Sites in which grafts are most commonly useful include the nasal tip, dorsum, ala, and sidewall as well as the eyelids and the ears.
Graft survival depends on the ingrowth of capillaries from the recipient site for survival, so a viable base of tissue with some vascularity is needed. Provision of vascularity from peripheral to the wound, or “bridging,” may supply up to about 5 mm of the periphery of the graft. A defect without adequate vascularity may be allowed to heal secondarily for a time to allow growth of granulation tissue, and then a delayed graft may be performed. Alternately, a muscle or soft tissue flap may be moved into the wound base, providing a vascular bed for the graft.[rx] In the first 24 hours after placement, the graft absorbs transudate from the recipient bed and becomes edematous, a stage known as “plasmatic imbibition.” Fibrin acts as a physiologic adhesive that holds the graft in place during this time. The fibrin is eventually replaced by granulation tissue. Vascular anastomoses between the recipient bed and donor graft begin to develop at about 48 to 72 hours after grafting. This process is known as “inosculation.” Full circulation is restored within 4 to 7 days, and a lymphatic circulation occurs within 7 days. Although re-innervation of the graft begins 2 to 4 weeks after grafting, full sensation may require several months or even years to return to normal.
Types of Skin Grafting
- Autologous – The donor skin is taken from a different site on the same individual’s body (also known as an autograft).
- Isogeneic –The donor and recipient individuals are genetically identical (e.g., monozygotic twins, animals of a single inbred strain; isograft or syngraft).
- Allogeneic – The donor and recipient are of the same species (human→human, dog→dog; allograft).
- Xenogeneic – The donor and recipient are of different species (e.g., bovine cartilage; xenograft or heterograft).
- Prosthetic – Lost tissue is replaced with synthetic materials such as metal, plastic, or ceramic (prosthetic implants).[rx]
Graft classification
Skin grafts can be
- Split-thickness – A split-thickness skin graft (STSG) is a skin graft including the epidermis and part of the dermis. Its thickness depends on the donor site and the needs of the person receiving the graft. It can be processed through a skin mesher which makes apertures onto the graft, allowing it to expand up to nine times its size. Split-thickness grafts are frequently used as they can cover large areas and the rate of autorejection is low. The same site can be harvested again after six weeks.[rx] The donor site heals by re-epithelialisation from the dermis and surrounding skin and requires dressings. Split-thickness skin grafts are indicated for large wounds and can survive on relatively avascular sites where an FTSG would typically fail. STSGs are typically reserved for sites that are too large for an FTSG or flap.[rx]
- Full-thickness – A full-thickness skin graft consists of the epidermis and the entire thickness of the dermis. The donor site is either sutured closed directly or covered by a split-thickness skin graft full-thickness skin grafts are indicated for small avascular areas less than 1 cm or for larger areas with good blood supply as the metabolic demands of the additional adnexal structures of FTSG increase the likelihood of necrosis.[rx]Large grafts over bone or cartilage without any intervening tissue are prone to failure. Delayed grafting or using hinge flaps to cover the exposed avascular tissue are some options to allow for placement of FTSG.
- Composite graft – A composite graft is a small graft containing skin and underlying cartilage or other tissue. Donor sites include, for example, ear skin and cartilage to reconstruct nasal alar rim defects.Composite grafts are indicated in situations where a donor site has lost underlying muscle or bone. The most common composite graft in dermatologic surgery are grafts containing cartilage used to reinforce the nose or ear.[rx]
In general, surgeons should choose the simplest closure that will provide the best cosmetic result. Grafts are typically considered when secondary intent, primary closure, or flap closure are not adequate for closing the wound.[rx]
Indications
Indications of graft transplantation
Skin grafts are mostly used to resurface extensive skin defects located mainly in the lower extremities of dogs and cats. The most common indications for skin grafts include the following
- Degloving injuries due to traffic accidents or bite wounds from other animals characterized by denuded skin on the limbs (Figure 1). Degloving may be mechanical in nature in cases where the epidermis becomes detached from the subcutaneous tissues due to skin entrapment in the wheels of automobiles, or it may be functional where necrosis of extensive areas of skin occurs due to ischaemia of the subcutaneous vascular plexus and bacterial infection. Degloving injuries are initially treated as open wounds; following granulation tissue formation, they are covered by skin grafts.
- Shearing wounds.
- Recent surgical wounds created by the removal of extensive tumours of the skin and subcutaneous tissue.
- Cellulitis or necrotizing fasciitis.
- Ischaemic bandage injuries.
- Reptile or arthropod bites.
- Skin burns that occasionally occur in animals and are mainly located on the trunk and less commonly on the limbs.
- Defects caused by toxic epidermal necrolysis.
Equipment
Essential equipment is minimal and includes the following:
Preoperatively
-
Local anesthetic (typically lidocaine 0.5% with epinephrine 1:200,000 and buffered with sodium bicarbonate)
-
3 cc syringe(s)
-
30 gauze needle(s)
-
Antiseptic scrub
-
Surgical marker
-
Foil or other material for a template of defect
Intraoperatively
-
Sterile drape
-
Scalpel with #15 blade
-
Toothed forceps
-
Serrated scissors (for trimming away fat from graft)
-
Suture scissors
-
Needle holders
-
Normal saline
-
Sterile gauze
-
Absorbable suture (for subcutaneous/deep stitches)
-
Cutaneous suture (non-absorbable or absorbable)
-
Ideally, an electrosurgical device should be available for hemostasis
Postoperatively
-
Nonstick dressing
-
Petrolatum-infused gauze strip or other material to form a bolster over the graft site. This may be sutured or taped securely in place to provide some pressure and to keep graft immobilized.
-
Sterile ointment (author prefers sterile petrolatum to antibiotic ointment as significant numbers of patients develop allergies to bacitracin and neomycin, while their ability to decrease infection is minimal)
-
Adhesive dressing, preferably hypoallergenic and stretchy.
-
Additional adhesive liquid may be used to further secure dressing
How a Skin Graft Is Done
- The wound is prepped for surgery. The wound is cleaned and measured. Then, a pattern is traced for transfer to the donor site.
- Anesthesia is administered. Depending on the size, severity, and location of the wound, as well as the type of graft, the procedure may require local anesthesia, regional anesthesia, iv sedation, general anesthesia, or a combination of these.
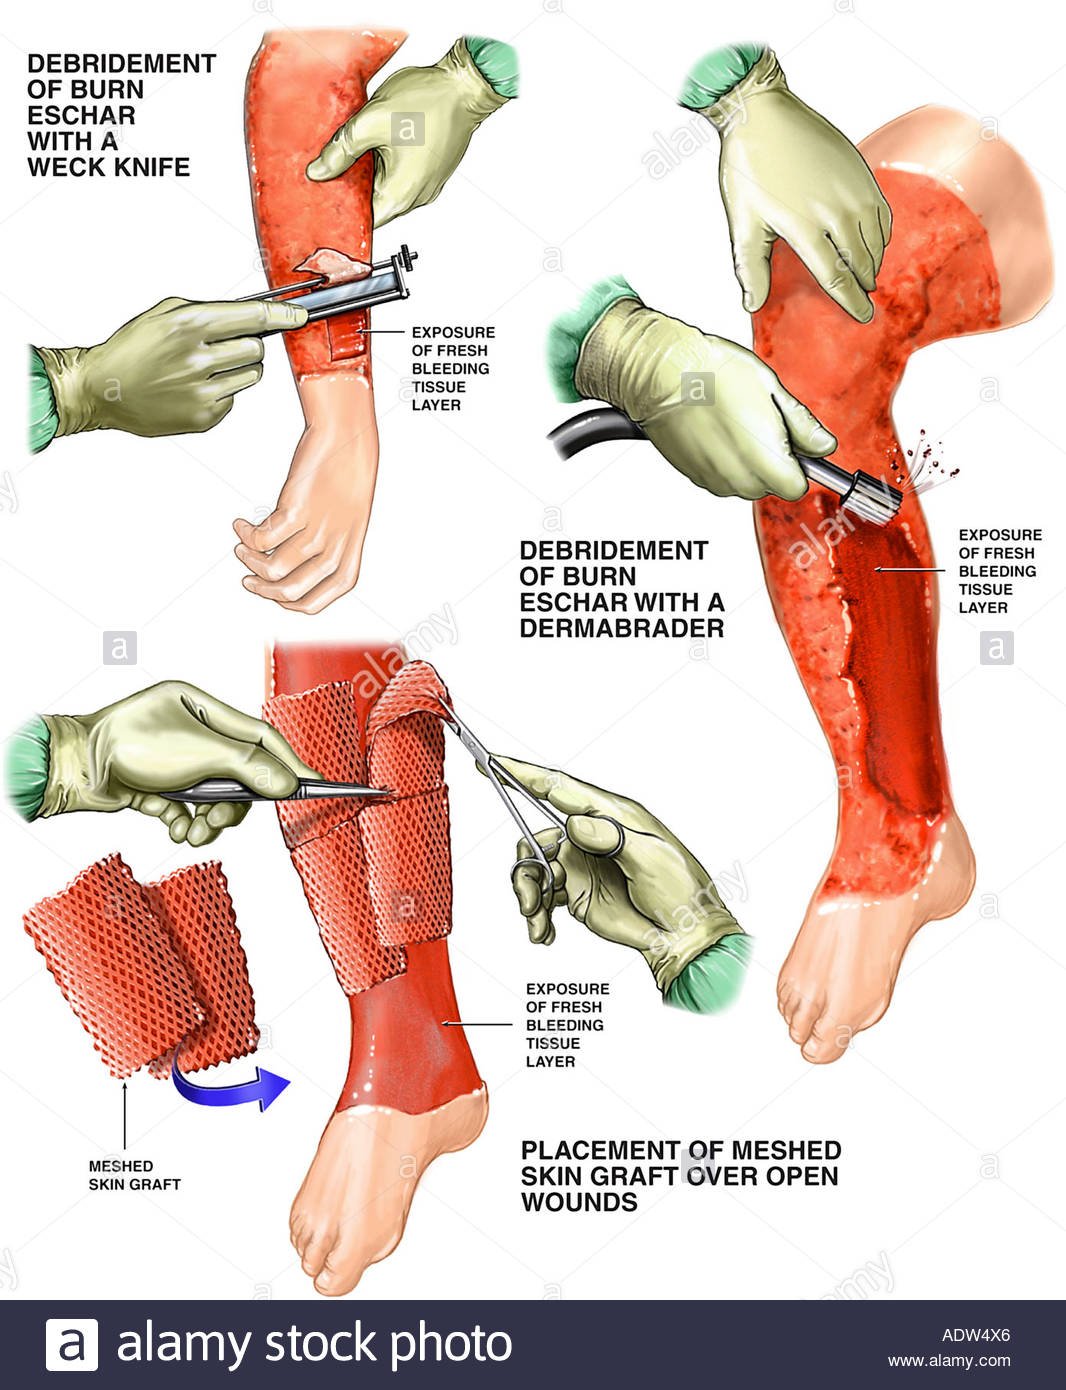
- The donor skin is harvested and prepared. The skin is either removed with a scalpel or with the help of a special harvesting machine called a dermatome. The graft may also be “meshed,” a process wherein multiple controlled incisions are placed in the graft. This technique allows fluid to leak out from the underlying tissue and the donor skin to spread out over a much larger area.
- The donor site is then closed. With a full-thickness or composite graft, this is done with sutures. With a split-thickness graft, sutures are not needed at the donor site.
- The graft is placed on the recipient site. Once in place, the graft is fastened to the surrounding tissues with sutures or staples.
Applying Split-Thickness Skin Grafts
Step 1
- The patient is brought into the operating room, appropriately positioned, and prepped and draped in the usual sterile manner. The length, width, and depth of the wound are measured to determine the size of the donor site (see Figure 4). All undermining must be taken into account and excised before grafting. When the skin is meshed, it will cover a larger surface area. If the wound is going to be excised rather than debrided, the depth of the lesion may increase dramatically and a larger piece of skin will be required for coverage. The template for the dermatome also should be selected at this time.
Step 2
- The measurements are carefully drawn at the donor site with a surgical marking pen (see Figure 5). The donor site can be in various locations, including the outer thigh, the inguinal ligament region, the posterior leg, the lateral malleolus, the popliteal fossa, or the dorsal foot. The area is then prepped with sterile mineral oil. Tongue blades work best in the application of this substance as gauze will absorb too much of the oil.
- The template and dermatome blade also are coated with a thin layer of the oil (see Figure 6). At this juncture, the thickness of the graft is determined and can range from 0.0008 of an inch to 0.020 of an inch. The author prefers a harvested graft of 0.0015 of an inch, if feasible. Each patient has different requirements (the thinner the graft, the better the “take”).
Step 3
- At the donor site, the tongue blades are placed distal and proximal for the purpose of applying some tension. The dermatome is positioned at approximately a 45-degree angle so the underlining skin markings can be visualized before taking the skin (see Figure 7). The dermatome moves downward until contact is made with the skin. The instrument then moves almost parallel to the donor site. Steady and equal pressure is applied while the skin is under tension until the appropriate amount of donor skin has been procured.
- The dermatome is then slowly angulated upward, releasing the skin from the site. During this process, having an assistant tease the skin from the dermatome to prevent it from getting caught in the blade is important. The donor site is then allowed to sanguinate for several minutes before it is covered with xeroform (Medline Industries, Inc., Mundelein, Ill.) gauze. This will aid in adherence to the site and will be less problematic for the patient.
Step 4
- The donor skin is transferred (dermal side up to avoid any confusion regarding orientation) to a skin graft carrier in preparation for meshing (the skin will curl toward the dermis. See Figure 8). Atraumatic forceps should be used to prevent tearing the skin. The clinician should make certain that the dermal carrier is ridged side up or the skin will not mesh. This side of the carrier is usually marked; clinicians can feel the ridges with their figers.
- The skin is prepped with saline, gently spread out so no curled edges or air bubbles are visible, and the carrier is placed in the mesher (see Figure 9). As the skin is being meshed, an assistant should tease the skin away from the mesher to prevent shredding. This author prefers the 1.5:1 mesh; the 3:1 is also useful, especially for larger defects. The skin is covered with moistened saline gauze. If a mesher is not available or the skin is too large to fit the carrier, it can be “pie-crusted” to facilitate drainage which is easily performed with an #11 blade.
Step 5
- The wound site should be debrided with cold steel or excised, including any undermining. During debridement, the edges of the wound will need to be “freshened” or excised (see Figure 10) and then flushed with jet lavage (see Figure 11) to thoroughly cleanse the wound bed. The author prefers to incorporate antibiotics such as bacitracin or polymyxin in this solution; however, normal saline is also acceptable. All bleeders are clamped and/or cauterized at this time to prevent the formation of hematoma.
Step 6
- The carrier is held adjacent to the wound, and the skin is teased off this device and placed directly over the defect. The harvested skin had been placed on the carrier dermal side up, so repositioning is unnecessary. The graft is then stapled in place. Sutures, steri-strips, or non adherent dressings also can be used for this purpose
Step 7
- A stent dressing is fabricated by creating at least four long sutures opposing each other at the wound site. Several materials can be used to fabricate this dressing. The author places moistened gauze in a large piece of Vaseline(R) gauze (Chesebrough-Ponds Inc., Greenwich, Conn.) and folds it, creating a “ball” of petroleum jelly. He applies this gauze to the wound site and sutures it in place with long sutures (see Figure 14). This dressing creates continuous compression of the harvested skin against the wound bed
Step 8
- The donor site is dressed with xeroform, sterile gauze, and a mild compression dressing. Although the author prefers foam tape, paper tape is also acceptable.
Step 9
- The wound is dressed with sterile gauze, fluffs, ABD pads or combine dressing (Surgipad, Johnson and Johnson, Arlington, Tex.), and a soft gauze wrap. A posterior splint is applied under a double 6-inch Ace (Becton, Dickinson, and Company, Franklin Lakes, NJ) wrap .
Step 10
- The patient is required to stay in the hospital for 23 hours at full bed rest and is discharged with no weight bearing on the affected limb. After gait training from a physical therapist, a walker is usually dispensed to aid mobility. The original dressing is left intact for approximately 1 week unless deleterious signs such as pain, fever, or bleeding are present. A home healthcare nurse will visit the patient for the first 3 days postoperatively to assess circulation of the limb and to monitor vital signs. The patient is then seen weekly by the clinician and the splint is incorporated in the dressing for a period of at least 2 weeks.
- The gauze at the donor site is usually removed several days postoperatively; the xeroform gauze is usually left intact and allowed to dry to peel off. Although this appears to be contrary to the precepts of moist wound healing, it seems to be the most efficient and least problematic option for the patient. The physician should be aware that the donor site can be more painful for the patient than the graft site.
Nursing Implications
Donor site. During the procedure, the physician will apply xeroform, which remains in place until it exfoliates on its own. The xeroform can be trimmed as it peels away from the donor site. The clinician should make sure a protective dressing, such as lyofoam, is applied until the site is healed. The clinician will need to instruct the patient that he or she may have more pain at the donor site than at the graft site. Pain relief measures should be offered, as well as information on donor site care.
Graft site. The clinician will perform the first dressing change approximately 7 days after the procedure, which involves the following:
- Remove the dressing slowly. Keep in mind that moistening the dressing with saline may be necessary to avoid damage to the graft. If a stent dressing is in place, the physician or nurse who is skilled in this area should perform the removal. Hydrogen peroxide is sometimes used to lift the dressing from the graft site. However, this substance can be cytotoxic; therefore, it should not come into contact with the graft, if possible.
- Note amount, color, and odor of drainage.
- Gently cleanse the site with saline irrigation and pat with dry gauze.
- Apply Adaptic (Johnnson + Johnson, Somerville, NJ), Mepitel (Molnlycke Health Care, Eddystone, Pa.), or a similar dressing material directly onto the graft. Then cover it with lyofoam, gauze, gauze roll, and mild compression with a 3- to 4-inch Coban (Medline, Mundelein, Ill.). You may slit the top of the Coban to allow for any swelling. If the physician has recommended a splint, reapply per the physician’s order for the prescribed length of time.
- With each dressing change, assess the site for any signs of maceration. If excessive maceration occurs, apply xeroform and lyofoam, or a plain hydrocellular dressing.
- Protect the area from pressure and/or shear injury.
- Assess for signs and symptoms of wound infection and report these to the physician as needed.
- Assess the graft site for signs of graft failure and report these to the physician as needed.
- This dressing remains in place for 5 to 7 days.
The clinician will perform the second dressing change 5 to 7 days later, which involves the following
- Gently and slowly remove the dressing. If the dressing sticks, moisten it with saline.
- If a large amount of drainage is noted, increasing dressing changes to every 3 to 5 days may be necessary.
- Assess the area for signs and symptoms of infection and report these to the physician.
- Assess the graft site for signs of failure and report these to the physician.
- The previous dressing may be continued if no problems with maceration are evident. If maceration is a problem, use xeroform with lyofoam or lyofoam alone.
- The frequency of dressing changes after 2 weeks following the graft will depend on the status of the wound and physician orders.
- A pressure bandage is applied over the graft recipient site. A special vacuum apparatus called a wound VAC may be placed over the area for the first 3 to 5 days to control drainage and increase the graft’s chances of survival.
- Healing begins. At first, the graft uses oxygen and nutrients from the tissue at the recipient site to survive. New blood vessels begin to grow within the first 36 hours, followed by new skin cells which then begin to grow from the graft to cover the recipient area with new skin.
- Both the donor and recipient sites should be kept moist and well-protected. Your physician will instruct you on the proper use of medications and bandaging.
Complications
-
Infection
-
Bleeding
-
Scar
-
Poor cosmesis
-
Wound breakdown
-
Flap failure
-
Graft failure (hematoma/seroma)
-
Need for further surgery
References
[bg_collapse view=”button-orange” color=”#4a4949″ expand_text=”Show More” collapse_text=”Show Less” ]
- https://www.ncbi.nlm.nih.gov/books/NBK532874/
- https://www.ncbi.nlm.nih.gov/books/NBK532875/
- https://www.ncbi.nlm.nih.gov/books/NBK470219/
- https://www.ncbi.nlm.nih.gov/pmc/articles/PMC3335647/
- https://en.wikipedia.org/wiki/Skin_grafting
- https://www.sciencedirect.com/science/article/abs/pii/S0305417917302656
- https://www.sciencedirect.com/topics/medicine-and-dentistry/skin-transplantation
- https://www.verywellhealth.com/skin-grafts-in-reconstructive-surgery-2710284
- https://www.nhs.uk/conditions/plastic-surgery/what-happens/
- https://scholar.google.com/scholar_lookup?
- https://www.surgeryencyclopedia.com/Pa-St/Skin-Grafting.html
- https://www.o-wm.com/content/applying-split-thickness-skin-grafts-a-step-step-clinical-guide-and-nursing-implications
[/bg_collapse]